Creating the DHCP Option 66
Note: Not all DHCP servers have the capability to add or change the scope option, namely built in DHCP servers in Firewalls/ Routers.
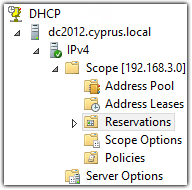
When using the Microsoft DHCP server, the option can be set from the DHCP Console (“Administrative tools > DHCP“). Other DHCP servers can also be used to accomplish this, however the following guide is based on the Microsoft DHCP server.
DHCP Option 66 was used in a recent deployment – read more about that here.
There are three options that can be used:
- Global Scope – The option will apply to each DHCP client
- Reservation Scope – The option will apply to matching MAC addresses only
- Dynamic Scope – This option requires a device vendor identification.
Global Scope
- Open the DHCP server
- Navigate to the IPv4 Scope to “Scope Options”
- Scroll down to find Option 66 “Boot Server Host Name”
- Navigate to your phone on this page to find what needs to be entered in the “String Value” field.
Reservation Scope
- Open the DHCP Server
- Navigate to the IPv4 Scope to “Reservations“
- Right click this option and select “New Reservation“
- Enter a name, the MAC address of the IP Phone and the assigned IP address
- Right click on the created reservation.
- Select “Configure Options“
- Scroll down to find and select Option 66 “Boot Server Host Name“
- Navigate to your phone on this page to find what needs to be entered in the “String Value” field.
String Value
TFTP Phones
These phones cannot use httpss as a provisioning option, as a TFTP server needs to be installed on the network.
Click here for a guide on how to configure a TFTP server for 3CX.
[3cx-clicktotalk id="29505" title="AatroxComms"]
Cisco 79XX
IP-3CX-Phone-System only

HTTP Phones
HTTP phones are able to download the configuration from the web server directly, although does not support PnP. It is required to obtain the URL from the 3CX phone system installation.
Select “System Status” from the 3CX Management Console and copy the URL located in “For local provisioning enter this link“.

Cisco SPA
https://single.cyprus.local/provisioning/ylqd9x1eid/$MA.xml

Aastra
https://single.cyprus.local/provisioning/ylqd9x1eid

Polycom
https://single.cyprus.local/provisioning/ylqd9x1eid

Panasonic
https://single.cyprus.local/provisioning/ylqd9x1eid/Config{MAC}.cfg

